Deckbuilding
Support Cards grant bonuses to various aspects throughout a Career. There are, however, hundreds of Support Cards in the game: How do we choose which cards to bring?
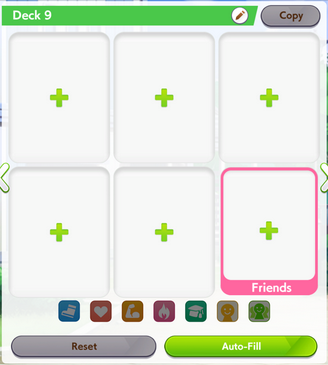
The Support Card Deck menu before starting a Career.
Building our best Support Card deck is ultimately determined by four factors:
- The Track’s Stamina requirements
- The Uma’s Growth Rates
- Available Sparks
- Available Support Cards
Given the above, our goals, in order, are:
- Acquire sufficient Stamina for the track
- Cap Speed
- Maximize Power and Wit
- Obtain enough SP to buy all relevant Skills
Obtaining Cards
Cards are obtained through the Scout tab on the Home Screen.
Umamusume is a gacha game, and a key part of building your account is managing your Carats.
DANGER
Always plan to pull in increments of 200 (ideally 400 to improve chance of MLB).
The first response to every "Should I Pull?" question is "Do you have 200 pulls?"
An important concept to consider when deck building is that there are only 6 available card slots. Ensuring that maximal value is attained from each card is the key to being competitive in PVP events. The highest value slot-ins will always be MLB SSR cards. An MLB SSR card is 5 copies of the same card, which will often cost 400 or more draws.
INFO
Good MLB SRs are significantly better than most low LB SSRs.
For example, MLB Shinko Windy SR Speed is superior to 1LB Kitasan Black SSR Speed.
TIP
If you are lacking MLB SRs, that is a sign that you should be saving up pulls to spark (200-pull) the next good Support Card Banner.
The snack-eating monkey throws 10-pulls at random banners and never has enough carats to guarantee a pull when it matters. (credit: セリル / seriru)
Consequently, it is imperative that you save your draws. Unlike several other gacha games, pulls in this game do not carry over between banners. Therefore, every pull that doesn’t go towards a full pity is effectively wasted, and one “unlucky” banner can set your account back. It is important to show restraint: Don’t be a snack eating monkey!
Choosing Cards
When looking at a Support Card’s stats, these are the effects that should be generally prioritized, from most to least important:
- Friendship Bonus
- Race Bonus
- Stat Bonus
- Training Effectiveness
- Mood Effect
- Specialty Priority
- Literally everything else
For the next few scenarios, Speed/Wit decks are the most prevalent. Assuming sufficient Stamina, Speed and Wit are the two most important stats to cap. Speed/Wit decks are also the most consistent due to Wit Friendship Recovery. This provides our Career with some much needed energy efficiency.
Power ![]() Cards are often put on the backburner in favor of Speed and Wit cards, and are only worth running if the skills they provide are valuable while not negatively affecting Stat goals. Some examples are
Cards are often put on the backburner in favor of Speed and Wit cards, and are only worth running if the skills they provide are valuable while not negatively affecting Stat goals. Some examples are ![]() Yaeno Muteki,
Yaeno Muteki, ![]() El Condor Pasa, and
El Condor Pasa, and ![]() Daitaku Helios. These cards have 10% Race Bonus and provide valuable Skills for different use cases.
Daitaku Helios. These cards have 10% Race Bonus and provide valuable Skills for different use cases.
Stamina ![]() Cards are situationally good for Medium and Long Tracks. However, strong Stamina Cards are few and far between. For the foreseeable future,
Cards are situationally good for Medium and Long Tracks. However, strong Stamina Cards are few and far between. For the foreseeable future, ![]() Super Creek will be the gold standard.
Super Creek will be the gold standard.
Guts ![]() cards become viable when Speed, Wit, and Power are able to be maxed comfortably. Guts decks start to see use in MANT, but become irrelevant in the following scenario, Grand Live. Guts cards remain niche until the release of Orfevre Guts on the 3rd Anniversary of the game.
cards become viable when Speed, Wit, and Power are able to be maxed comfortably. Guts decks start to see use in MANT, but become irrelevant in the following scenario, Grand Live. Guts cards remain niche until the release of Orfevre Guts on the 3rd Anniversary of the game.
Stamina Requirements
To determine the necessary Stamina ![]() for a given Track, it is recommended to use Umalator. Once on the site, input the desired track and track conditions (e.g. Firm).
for a given Track, it is recommended to use Umalator. Once on the site, input the desired track and track conditions (e.g. Firm).
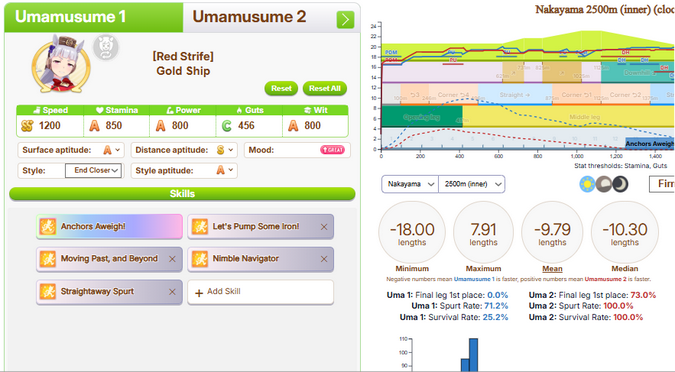
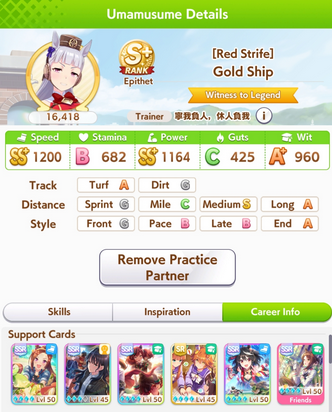
Example 1: A Gold Ship built for Nakayama 2500m, the Arima Kinen, and track conditions for Sagittarius Cup. With no recovery skills, she currently has a 71.2% Spurt Rate.
Input basic desired skills for an Uma, then look at the Spurt Rate on screen.
The goal here is a 90-99% Spurt Rate. 71.2% is not ideal, and a Recovery Skill would be necessary to further supplement the Uma’s Stamina.
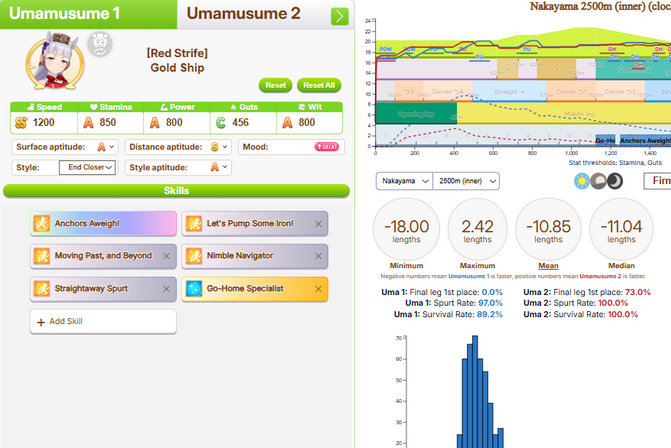
Example 2: Another Gold Ship built for the same conditions as Example 1. With Go-Home Specialist, she now has a 97% Spurt Rate.
Here is a chart that provides comfortable Stamina values for important Distances:
| No Gold Recoveries | One Gold Recovery | One Gold Recovery + 2 Debuffs | |
|---|---|---|---|
| Chukyo 1200m | 300/400 | - | - |
| Tokyo 1600m | 600/500 | 500/500 | - |
| Oi 2000m | 850/600 | 700/500 | 800/500 |
| Hanshin 2200m | 900/600 | 750/600 | 850/600 |
| Nakayama 2500m | 1050/700 | 950/650 | - |
| Kyoto 3200m | 1600/1200 lmao | 1500/1000 | - |
All checks were done in Umalator with a Pace Chaser, 800 Wit, distance S with max acceleration, and a goal of 95%+ spurt and survival rate.
TIP
Due to Downhill Mode, higher Wit can lower Stamina requirements significantly on many Tracks.
Importance of Race Bonus
Race Bonus is the most effective way to increase Skill Point gain throughout a Career run. The quantity of Skills is often the biggest difference between competitive Umas. Each Skill grants effective Length gain, so 3 more Velocity Skills over the opponent can translate to several additional Lengths gained throughout the Race.
Race Bonus increases the rewards of some Career Events and Optional Races. The chart below outlines several Race Bonus thresholds.
| Race Bonus | 0% RB | 20% RB | 34% RB | 50% RB | 67% RB |
|---|---|---|---|---|---|
| EX | +10 All Stats +40/60/80 SP | +12 All Stats +48/72/96 SP | +13 All Stats +53/80/107 SP | +15 All Stats +60/90/120 SP | +16 All Stats +66/100/133 SP |
| Career | +3 All Stats | +3 All Stats | +4 All Stats | +4 All Stats | +5 All Stats |
| G1 | +10 Random Stat +45 SP | +12 Random Stat +54 SP | +13 Random Stat +60 SP | +15 Random Stat +67 SP | +16 Random Stat +75 SP |
| G2/G3 | +8 Random Stat +35 SP | +9 Random Stat +42 SP | +10 Random Stat +46 SP | +12 Random Stat +52 SP | +13 Random Stat +58 SP |
| OP | +5 Random Stat +30 SP | +6 Random Stat +36 SP | +6 Random Stat +40 SP | +7 Random Stat +45 SP | +8 Random Stat +50 SP |
In a hypothetical career with 14 Races, consisting of 1 G2, G1s, and other optional Races, 20% Race Bonus will give 798 SP. If the same career was instead run with 50% Race Bonus, the 14 Races would give 992 SP instead; this is equivalent to around 2 additional Skills.
TIP
In Unity Cup, players with a restrictive Card pool should aim for 35%,
while those with several MLB SSR cards should aim for 50%.
Races are best done on turns without good Training options, and a decent Career should have at least 15 total races.
Power vs. Wit
Power ![]() and Wit
and Wit ![]() are the two principal Stats which dictate how well an Uma performs in the early- and mid-race: The caliber of the lobby is determined by how high the average Power and Wit stats are across all Umas. Power helps the Uma gain a good initial position, and Wit helps the Uma maintain and fight for said position. Both stats are essential for achieving a consistently high win rate, especially in competitive lobbies.
are the two principal Stats which dictate how well an Uma performs in the early- and mid-race: The caliber of the lobby is determined by how high the average Power and Wit stats are across all Umas. Power helps the Uma gain a good initial position, and Wit helps the Uma maintain and fight for said position. Both stats are essential for achieving a consistently high win rate, especially in competitive lobbies.
Whether to take more Power or Wit is dependent on the Uma’s running style. End Closers and Late Surgers prefer Power to help them accelerate to their Top Speed faster in the late-race and switch lanes to maneuver around slower Umas. Pace Chasers and Front Runners will prefer to have more Wit to help them position towards the front of the pack.
Backline Build Example
Frontline Build Example
Additionally, Track Conditions are important when considering whether to build more Power or Wit. Wit is more important on Tracks with long Downhills; Power is more important on tracks with long Uphills and Soft/Heavy track conditions, which lower Power.
For further information, please refer to the Race Mechanics section.
Growth Rates
Each Uma has unique Stat Growth Rates, which increase the Stat gains from a given Training. This can ease the Spark requirements or Deck Building requirements for a given Uma.

Example of Growth Rates for Gold Ship, who gets +20% Stamina and +10% Power on her trainings