
Trackblazer Guide
also known as Make A New Track / MANT
Also check out our Agenda Planner!

did you know it also says "start of the climax" in JP
Decks
There are two basic frameworks for Trackblazer Decks.
WARNING
The Decks shown below are only basic outlines, and can be flexibly changed depending on the Distance, Skills required, and Growths of an Uma.
Stay at or above 50 Race Bonus!
Speed  + Wit
+ Wit 
The basic framework for the Speed + Wit Deck is 2 Speed and 2 Wit Cards. The remaining Slots can be filled flexibly depending on the Uma’s Growths and Skills required. Often, two Power Cards with good Skills, such as Yaeno Muteki, El Condor Pasa, or Smart Falcon are used in these Slots.
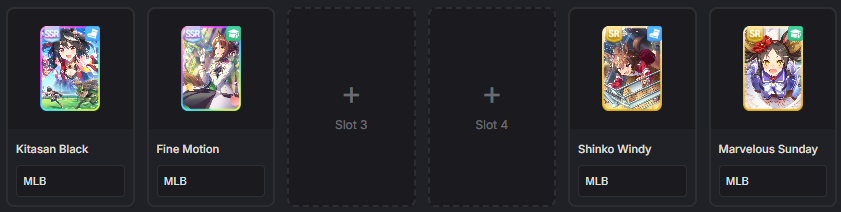
Free-to-play alternative with Fine Motion Borrow and 2 Flex Slots
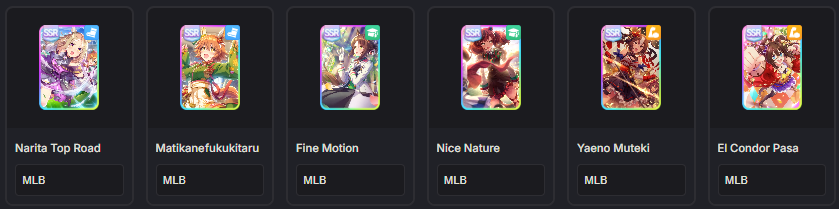
Example of using Power Cards for important Skills
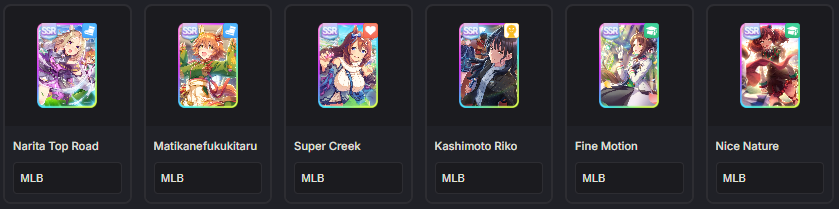
Example of using Flex Slots for Stamina requirements
Wit + Guts 
The base framework for this Deck is 3 Guts Cards and 2 Wit Cards. A fourth Guts Card or a Speed Card can be brought depending on the needs of the player.
The basic idea behind this Deck is that the player should mainly buy Guts Anklets, compared to the Speed + Wit Deck needing several different Items. This Deck can also cap Guts, providing an additional advantage over Speed + Wit Decks.
However, it can be difficult to source Skills when using Guts Cards, putting more emphasis on Legacies. In addition, it can also be similarly difficult to hit Stamina requirements for longer Races.
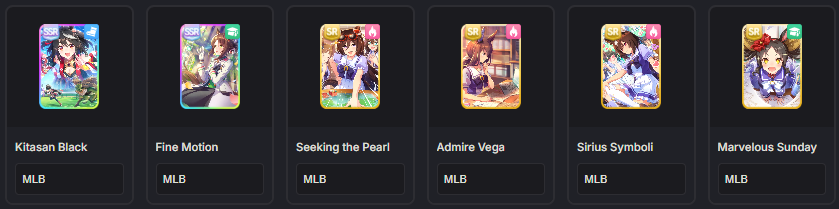
Free-to-play alternative with Fine Motion Borrow
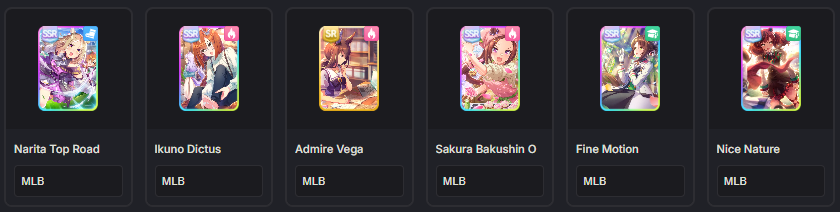
Alternative Deck with replacements for SR Cards
SSR Haru Urara Guts is a great card, but make sure to take its 0 Initial Friendship into account!
Races
In Trackblazer, around half the turns are spent racing: A typical Career can have anywhere from 30 to 40 Races. This is due to the fact that, unlike the two previous Scenarios, Races have additional rewards.
DANGER
An Uma's Career Goals and Secret Events are disabled in Trackblazer.
This can significantly affect an Uma's Career: For example, Silence Suzuka cannot acquire Runaway, and Mejiro Ardan cannot be inflicted with Glass Legs.
Race Rewards
On top of SP and Stats, Trackblazer Races will provide additional rewards: Grade Points and Shop Coins.
Grade Points
In Trackblazer, Uma-specific Career Goals are replaced with 4 Objectives.
| Date | Requirements (Turf) | Requirement (Dirt) |
|---|---|---|
| Late June, Junior Year | Debut Race | Debut Race |
| End of Junior Year | 60 Grade Points | 30 Grade Points |
| End of Classic Year | 300 Grade Points | 200 Grade Points |
| End of Senior Year | 300 Grade Points | 300 Grade Points |
INFO
Sprint Umas with poor Aptitudes in other Distances also follow the Dirt Grade Point Requirements.
DANGER
ALL Grade Points are consumed by the Career Goals, and will not carry over to the next Year.
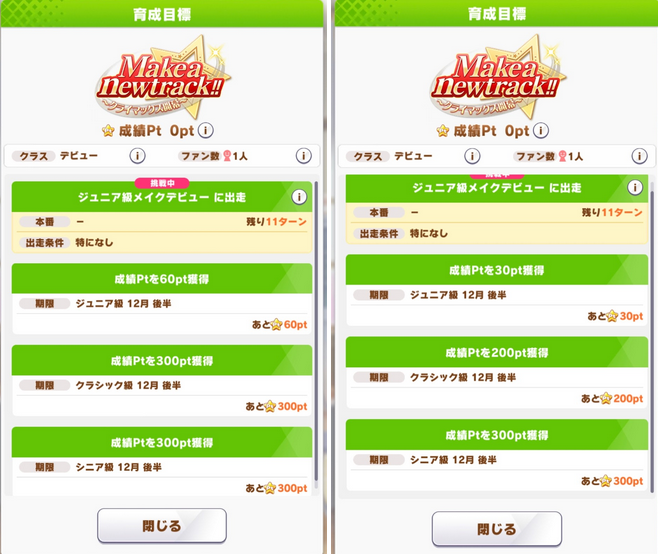
Objectives for Turf and Dirt Umas respectively
| Race Grade | Grade Points (1st Place) |
|---|---|
| G1 | 100 |
| G2 | 80 |
| G3 | 60 |
| OP | 40 |
| Pre OP | 20 |
| Placement | Grade Point Modifier |
|---|---|
| 1 | 100% |
| 2 | 60% |
| 3 | 40% |
| 4-5 | 20% |
| 6+ | 10% |
Shop Coins
Shop coins are currency spent to purchase Items in the Climax Store, a new mechanic introduced in Trackblazer. Shop Coins are awarded based on placement, and are not affected by the Grade of the Race.
The Items are explained in more detail below in the Shop section.
| Placement | Shop Coins |
|---|---|
| 1st | 100 |
| 2nd or 3rd | 60 |
| 4th or 5th | 30 |
| 6th and lower | 0 |
The fundamental gameplay loop consists of Racing for Coins, spending the Coins on Items, and using the Items to improve upcoming Training and Race outcomes. Winning Races may also add new Items to the Shop.
Stats
Epithets/Race Routes
Apart from the Stats directly gained through running Races, Trackblazer also has routes of Races that provide extra Stats when winning all Races included.
Rival Race
In Trackblazer, certain Races will randomly be marked as a Rival Race. When winning a Rival Race, more Stats and a tailored Skill is awarded.

A Rival Race
INFO
Races in Trackblazer have lower SP rewards compared to Races in URA Finale and Unity Cup.
Below is a table containing the base Stat and SP values along with the scaling based on RB and Hammers.
| Race Bonus | OP | G2/G3 | G1 | Twinkle Star (Total Stats) | ||||||||||||||||||||
|---|---|---|---|---|---|---|---|---|---|---|---|---|---|---|---|---|---|---|---|---|---|---|---|---|
| No Hammer | Small (20%) | Gold (35%) | No Hammer | Small (20%) | Gold (35%) | No Hammer | Small (20%) | Gold (35%) | No Hammer | Small (20%) | Gold (35%) | |||||||||||||
| Stat | SP | Stat | SP | Stat | SP | Stat | SP | Stat | SP | Stat | SP | Stat | SP | Stat | SP | Stat | SP | Stat | SP | Stat | SP | Stat | SP | |
| 0% | 5 | 20 | 6 | 24 | 6 | 27 | 8 | 25 | 9 | 30 | 10 | 33 | 10 | 35 | 12 | 42 | 13 | 47 | 50 | 30 | 60 | 36 | 65 | 40 |
| 30% | 6 | 26 | 7 | 31 | 8 | 35 | 10 | 32 | 12 | 38 | 13 | 43 | 13 | 45 | 15 | 54 | 17 | 60 | 65 | 39 | 75 | 46 | 85 | 52 |
| 35% | 6 | 27 | 7 | 32 | 8 | 36 | 10 | 33 | 12 | 39 | 13 | 44 | 13 | 47 | 15 | 56 | 17 | 63 | 65 | 40 | 75 | 48 | 85 | 54 |
| 40% | 7 | 28 | 8 | 33 | 9 | 37 | 11 | 35 | 13 | 42 | 14 | 47 | 14 | 49 | 16 | 58 | 18 | 66 | 70 | 42 | 80 | 50 | 90 | 56 |
| 45% | 7 | 29 | 8 | 34 | 9 | 39 | 11 | 36 | 13 | 43 | 14 | 48 | 14 | 50 | 16 | 60 | 18 | 67 | 70 | 43 | 80 | 51 | 90 | 58 |
| 50% | 7 | 30 | 8 | 36 | 9 | 40 | 12 | 37 | 14 | 44 | 16 | 49 | 15 | 52 | 18 | 62 | 20 | 70 | 75 | 45 | 90 | 54 | 100 | 60 |
| 55% | 7 | 31 | 8 | 37 | 9 | 41 | 12 | 38 | 14 | 45 | 16 | 51 | 15 | 54 | 18 | 64 | 20 | 72 | 75 | 46 | 90 | 55 | 100 | 62 |
| 60% | 8 | 32 | 9 | 38 | 10 | 43 | 12 | 40 | 14 | 48 | 16 | 54 | 16 | 56 | 19 | 67 | 21 | 75 | 80 | 48 | 95 | 57 | 105 | 64 |
| 65% | 8 | 33 | 9 | 39 | 10 | 44 | 13 | 41 | 15 | 49 | 17 | 55 | 16 | 57 | 19 | 68 | 21 | 76 | 80 | 49 | 95 | 58 | 105 | 66 |
| 70% | 8 | 34 | 9 | 40 | 10 | 45 | 13 | 42 | 15 | 50 | 17 | 56 | 17 | 59 | 20 | 70 | 22 | 79 | 85 | 51 | 100 | 61 | 110 | 68 |
| 75% | 8 | 35 | 9 | 42 | 10 | 47 | 14 | 43 | 16 | 51 | 18 | 58 | 17 | 61 | 20 | 73 | 22 | 82 | 85 | 52 | 100 | 62 | 110 | 70 |
| 80% | 9 | 36 | 10 | 43 | 12 | 48 | 14 | 45 | 16 | 54 | 18 | 60 | 18 | 63 | 21 | 75 | 24 | 85 | 90 | 54 | 105 | 64 | 120 | 72 |
INFO
Twinkle Star Stat gains are divided equally across the 5 stats.
Full Table (1% increments)
| Race Bonus | OP | G2/G3 | G1 | Twinkle Star (Total Stats) | ||||||||||||||||||||
|---|---|---|---|---|---|---|---|---|---|---|---|---|---|---|---|---|---|---|---|---|---|---|---|---|
| No Hammer | Small (20%) | Gold (35%) | No Hammer | Small (20%) | Gold (35%) | No Hammer | Small (20%) | Gold (35%) | No Hammer | Small (20%) | Gold (35%) | |||||||||||||
| Stat | SP | Stat | SP | Stat | SP | Stat | SP | Stat | SP | Stat | SP | Stat | SP | Stat | SP | Stat | SP | Stat | SP | Stat | SP | Stat | SP | |
| 0% | 5 | 20 | 6 | 24 | 6 | 27 | 8 | 25 | 9 | 30 | 10 | 33 | 10 | 35 | 12 | 42 | 13 | 47 | 50 | 30 | 60 | 36 | 65 | 40 |
| 30% | 6 | 26 | 7 | 31 | 8 | 35 | 10 | 32 | 12 | 38 | 13 | 43 | 13 | 45 | 15 | 54 | 17 | 60 | 65 | 39 | 75 | 46 | 85 | 52 |
| 31% | 6 | 26 | 7 | 31 | 8 | 35 | 10 | 32 | 12 | 38 | 13 | 43 | 13 | 45 | 15 | 54 | 17 | 60 | 65 | 39 | 75 | 46 | 85 | 52 |
| 32% | 6 | 26 | 7 | 31 | 8 | 35 | 10 | 33 | 12 | 39 | 13 | 44 | 13 | 46 | 15 | 55 | 17 | 62 | 65 | 39 | 75 | 46 | 85 | 52 |
| 33% | 6 | 26 | 7 | 31 | 8 | 35 | 10 | 33 | 12 | 39 | 13 | 44 | 13 | 46 | 15 | 55 | 17 | 62 | 65 | 39 | 75 | 46 | 85 | 52 |
| 34% | 6 | 26 | 7 | 31 | 8 | 35 | 10 | 33 | 12 | 39 | 13 | 44 | 13 | 46 | 15 | 55 | 17 | 62 | 65 | 40 | 75 | 48 | 85 | 54 |
| 35% | 6 | 27 | 7 | 32 | 8 | 36 | 10 | 33 | 12 | 39 | 13 | 44 | 13 | 47 | 15 | 56 | 17 | 63 | 65 | 40 | 75 | 48 | 85 | 54 |
| 36% | 6 | 27 | 7 | 32 | 8 | 36 | 10 | 34 | 12 | 40 | 13 | 45 | 13 | 47 | 15 | 56 | 17 | 63 | 65 | 40 | 75 | 48 | 85 | 54 |
| 37% | 6 | 27 | 7 | 32 | 8 | 36 | 10 | 34 | 12 | 40 | 13 | 45 | 13 | 47 | 15 | 56 | 17 | 63 | 65 | 41 | 75 | 49 | 85 | 55 |
| 38% | 6 | 27 | 7 | 32 | 8 | 36 | 11 | 34 | 13 | 40 | 14 | 45 | 13 | 48 | 15 | 57 | 17 | 64 | 65 | 41 | 75 | 49 | 85 | 55 |
| 39% | 6 | 27 | 7 | 32 | 8 | 36 | 11 | 34 | 13 | 40 | 14 | 45 | 13 | 48 | 15 | 57 | 17 | 64 | 65 | 41 | 75 | 49 | 85 | 55 |
| 40% | 7 | 28 | 8 | 33 | 9 | 37 | 11 | 35 | 13 | 42 | 14 | 47 | 14 | 49 | 16 | 58 | 18 | 66 | 70 | 42 | 80 | 50 | 90 | 56 |
| 41% | 7 | 28 | 8 | 33 | 9 | 37 | 11 | 35 | 13 | 42 | 14 | 47 | 14 | 49 | 16 | 58 | 18 | 66 | 70 | 42 | 80 | 50 | 90 | 56 |
| 42% | 7 | 28 | 8 | 33 | 9 | 37 | 11 | 35 | 13 | 42 | 14 | 47 | 14 | 49 | 16 | 58 | 18 | 66 | 70 | 42 | 80 | 50 | 90 | 56 |
| 43% | 7 | 28 | 8 | 33 | 9 | 37 | 11 | 35 | 13 | 42 | 14 | 47 | 14 | 50 | 16 | 60 | 18 | 67 | 70 | 42 | 80 | 50 | 90 | 56 |
| 44% | 7 | 28 | 8 | 33 | 9 | 37 | 11 | 36 | 13 | 43 | 14 | 48 | 14 | 50 | 16 | 60 | 18 | 67 | 70 | 43 | 80 | 51 | 90 | 58 |
| 45% | 7 | 29 | 8 | 34 | 9 | 39 | 11 | 36 | 13 | 43 | 14 | 48 | 14 | 50 | 16 | 60 | 18 | 67 | 70 | 43 | 80 | 51 | 90 | 58 |
| 46% | 7 | 29 | 8 | 34 | 9 | 39 | 11 | 36 | 13 | 43 | 14 | 48 | 14 | 51 | 16 | 61 | 18 | 68 | 70 | 43 | 80 | 51 | 90 | 58 |
| 47% | 7 | 29 | 8 | 34 | 9 | 39 | 11 | 36 | 13 | 43 | 14 | 48 | 14 | 51 | 16 | 61 | 18 | 68 | 70 | 44 | 80 | 52 | 90 | 59 |
| 48% | 7 | 29 | 8 | 34 | 9 | 39 | 11 | 37 | 13 | 44 | 14 | 49 | 14 | 51 | 16 | 61 | 18 | 68 | 70 | 44 | 80 | 52 | 90 | 59 |
| 49% | 7 | 29 | 8 | 34 | 9 | 39 | 11 | 37 | 13 | 44 | 14 | 49 | 14 | 52 | 16 | 62 | 18 | 70 | 70 | 44 | 80 | 52 | 90 | 59 |
| 50% | 7 | 30 | 8 | 36 | 9 | 40 | 12 | 37 | 14 | 44 | 16 | 49 | 15 | 52 | 18 | 62 | 20 | 70 | 75 | 45 | 90 | 54 | 100 | 60 |
| 51% | 7 | 30 | 8 | 36 | 9 | 40 | 12 | 37 | 14 | 44 | 16 | 49 | 15 | 52 | 18 | 62 | 20 | 70 | 75 | 45 | 90 | 54 | 100 | 60 |
| 52% | 7 | 30 | 8 | 36 | 9 | 40 | 12 | 38 | 14 | 45 | 16 | 51 | 15 | 53 | 18 | 63 | 20 | 71 | 75 | 45 | 90 | 54 | 100 | 60 |
| 53% | 7 | 30 | 8 | 36 | 9 | 40 | 12 | 38 | 14 | 45 | 16 | 51 | 15 | 53 | 18 | 63 | 20 | 71 | 75 | 45 | 90 | 54 | 100 | 60 |
| 54% | 7 | 30 | 8 | 36 | 9 | 40 | 12 | 38 | 14 | 45 | 16 | 51 | 15 | 53 | 18 | 63 | 20 | 71 | 75 | 46 | 90 | 55 | 100 | 62 |
| 55% | 7 | 31 | 8 | 37 | 9 | 41 | 12 | 38 | 14 | 45 | 16 | 51 | 15 | 54 | 18 | 64 | 20 | 72 | 75 | 46 | 90 | 55 | 100 | 62 |
| 56% | 7 | 31 | 8 | 37 | 9 | 41 | 12 | 39 | 14 | 46 | 16 | 52 | 15 | 54 | 18 | 64 | 20 | 72 | 75 | 46 | 90 | 55 | 100 | 62 |
| 57% | 7 | 31 | 8 | 37 | 9 | 41 | 12 | 39 | 14 | 46 | 16 | 52 | 15 | 54 | 18 | 64 | 20 | 72 | 75 | 47 | 90 | 56 | 100 | 63 |
| 58% | 7 | 31 | 8 | 37 | 9 | 41 | 12 | 39 | 14 | 46 | 16 | 52 | 15 | 55 | 18 | 66 | 20 | 74 | 75 | 47 | 90 | 56 | 100 | 63 |
| 59% | 7 | 31 | 8 | 37 | 9 | 41 | 12 | 39 | 14 | 46 | 16 | 52 | 15 | 55 | 18 | 66 | 20 | 74 | 75 | 47 | 90 | 56 | 100 | 63 |
| 60% | 8 | 32 | 9 | 38 | 10 | 43 | 12 | 40 | 14 | 48 | 16 | 54 | 16 | 56 | 19 | 67 | 21 | 75 | 80 | 48 | 95 | 57 | 105 | 64 |
| 61% | 8 | 32 | 9 | 38 | 10 | 43 | 12 | 40 | 14 | 48 | 16 | 54 | 16 | 56 | 19 | 67 | 21 | 75 | 80 | 48 | 95 | 57 | 105 | 64 |
| 62% | 8 | 32 | 9 | 38 | 10 | 43 | 12 | 40 | 14 | 48 | 16 | 54 | 16 | 56 | 19 | 67 | 21 | 75 | 80 | 48 | 95 | 57 | 105 | 64 |
| 63% | 8 | 32 | 9 | 38 | 10 | 43 | 13 | 40 | 15 | 48 | 17 | 54 | 16 | 57 | 19 | 68 | 21 | 76 | 80 | 48 | 95 | 57 | 105 | 64 |
| 64% | 8 | 32 | 9 | 38 | 10 | 43 | 13 | 41 | 15 | 49 | 17 | 55 | 16 | 57 | 19 | 68 | 21 | 76 | 80 | 49 | 95 | 58 | 105 | 66 |
| 65% | 8 | 33 | 9 | 39 | 10 | 44 | 13 | 41 | 15 | 49 | 17 | 55 | 16 | 57 | 19 | 68 | 21 | 76 | 80 | 49 | 95 | 58 | 105 | 66 |
| 66% | 8 | 33 | 9 | 39 | 10 | 44 | 13 | 41 | 15 | 49 | 17 | 55 | 16 | 58 | 19 | 69 | 21 | 78 | 80 | 49 | 95 | 58 | 105 | 66 |
| 67% | 8 | 33 | 9 | 39 | 10 | 44 | 13 | 41 | 15 | 49 | 17 | 55 | 16 | 58 | 19 | 69 | 21 | 78 | 80 | 50 | 95 | 60 | 105 | 67 |
| 68% | 8 | 33 | 9 | 39 | 10 | 44 | 13 | 42 | 15 | 50 | 17 | 56 | 16 | 58 | 19 | 69 | 21 | 78 | 80 | 50 | 95 | 60 | 105 | 67 |
| 69% | 8 | 33 | 9 | 39 | 10 | 44 | 13 | 42 | 15 | 50 | 17 | 56 | 16 | 59 | 19 | 70 | 21 | 79 | 80 | 50 | 95 | 60 | 105 | 67 |
| 70% | 8 | 34 | 9 | 40 | 10 | 45 | 13 | 42 | 15 | 50 | 17 | 56 | 17 | 59 | 20 | 70 | 22 | 79 | 85 | 51 | 100 | 61 | 110 | 68 |
| 71% | 8 | 34 | 9 | 40 | 10 | 45 | 13 | 42 | 15 | 50 | 17 | 56 | 17 | 59 | 20 | 70 | 22 | 79 | 85 | 51 | 100 | 61 | 110 | 68 |
| 72% | 8 | 34 | 9 | 40 | 10 | 45 | 13 | 43 | 15 | 51 | 17 | 58 | 17 | 60 | 20 | 72 | 22 | 81 | 85 | 51 | 100 | 61 | 110 | 68 |
| 73% | 8 | 34 | 9 | 40 | 10 | 45 | 13 | 43 | 15 | 51 | 17 | 58 | 17 | 60 | 20 | 72 | 22 | 81 | 85 | 51 | 100 | 61 | 110 | 68 |
| 74% | 8 | 34 | 9 | 40 | 10 | 45 | 13 | 43 | 15 | 51 | 17 | 58 | 17 | 60 | 20 | 72 | 22 | 81 | 85 | 52 | 100 | 62 | 110 | 70 |
| 75% | 8 | 35 | 9 | 42 | 10 | 47 | 14 | 43 | 16 | 51 | 18 | 58 | 17 | 61 | 20 | 73 | 22 | 82 | 85 | 52 | 100 | 62 | 110 | 70 |
| 76% | 8 | 35 | 9 | 42 | 10 | 47 | 14 | 44 | 16 | 52 | 18 | 59 | 17 | 61 | 20 | 73 | 22 | 82 | 85 | 52 | 100 | 62 | 110 | 70 |
| 77% | 8 | 35 | 9 | 42 | 10 | 47 | 14 | 44 | 16 | 52 | 18 | 59 | 17 | 61 | 20 | 73 | 22 | 82 | 85 | 53 | 100 | 63 | 110 | 71 |
| 78% | 8 | 35 | 9 | 42 | 10 | 47 | 14 | 44 | 16 | 52 | 18 | 59 | 17 | 62 | 20 | 74 | 22 | 83 | 85 | 53 | 100 | 63 | 110 | 71 |
| 79% | 8 | 35 | 9 | 42 | 10 | 47 | 14 | 44 | 16 | 52 | 18 | 59 | 17 | 62 | 20 | 74 | 22 | 83 | 85 | 53 | 100 | 63 | 110 | 71 |
| 80% | 9 | 36 | 10 | 43 | 12 | 48 | 14 | 45 | 16 | 54 | 18 | 60 | 18 | 63 | 21 | 75 | 24 | 85 | 90 | 54 | 105 | 64 | 120 | 72 |
Epithets
Upon winning all Races in a Route, bonus Stats or Skills are awarded.
Main Routes
Below are the most important Routes that will often decide the Racing schedule.
Tiara Route
| Epithet | Requirement | Rewards |
|---|---|---|
| Lady | Win the Oka Sho, Japanese Oaks, and Shuka Sho | 2 Random Stats +10 |
| Heroine | Acquire the Lady Epithet, and win the Queen Elizabeth II Cup (Classic) | 2 Random Stats +10 |
| Goddess | Acquire the Lady Epithet, and win the Victoria Mile, Hanshin Juvenile Fillies, and both Queen Elizabeth II Cups | 2 Random Stats +15 |
| Mile a Minute | Win all unique Mile Turf G1 Races (Either Hanshin Juvenile Fillies or Asahi Hai Futurity Stakes) | Mile Straightaways Hint +1 |
Classic Route
| Epithet | Requirement | Rewards |
|---|---|---|
| Stunning | Win the Satsuki Sho, Japanese Derby, and Kikuka Sho | 2 Random Stats +10 |
| Incredible | Acquire the Stunning Epithet, and win either the Japan Cup (Classic) or Arima Kinen (Classic). | 2 Random Stats +15 |
| Phenomenal | Acquire the Stunning Epithet, and win 2 of the following Races: Tenno Sho (Spring), Takarazuka Kinen, Japan Cup, Tenno Sho (Autumn), Osaka Hai and Arima Kinen | 2 Random Stats +15 |
Sprint/Mile Route
| Epithet | Requirement | Rewards |
|---|---|---|
| Breakneck Miler | Win the NHK Mile Cup, Yasuda Kinen, and Mile Championship | 2 Random Stats +15 |
| Sprint Go-Getter | Win the Takamatsunomiya Kinen and Sprinters Stakes | 2 Random Stats +15 |
| Sprint Speedster | Win the Takamatsunomiya Kinen, Sprinters Stakes, Yasuda Kinen, and Mile Championship | 2 Random Stats +15 |
Spring/Autumn Route
| Epithet | Requirement | Rewards |
|---|---|---|
| Spring Champion | Win the Osaka Hai, Tenno Sho (Spring), and Takarazuka Kinen | 2 Random Stats +10 |
| Fall Champion | Win the Tenno Sho (Autumn), Japan Cup (Senior), and Arima Kinen (Senior) | 2 Random Stats +10 |
| Shield Bearer | Win the Tenno Sho (Spring) and Tenno Sho (Autumn) | 2 Random Stats +10 |
| Legendary | Acquire either Lady or Stunning, and both Spring Champion and Autumn Champion Epithets | Homestretch Haste Hint +1 |
Dirt Route
| Epithet | Requirement | Rewards |
|---|---|---|
| Dirty Work | Win 5 Dirt Races | 2 Random Stats +5 |
| Playing Dirty | Win 10 Dirt Races | 2 Random Stats +10 |
| Eat My Dust | Win 15 Dirt Races | 2 Random Stats +10 |
| Dirt G1 Achiever | Win 3 Dirt G1 Races | 2 Random Stats +10 |
| Dirt G1 Star | Win 4 Dirt G1 Races | 2 Random Stats +10 |
| Dirt G1 Powerhouse | Win 5 Dirt G1 Races | 2 Random Stats +15 |
| Dirt G1 Dominator | Win 9 Dirt G1 Races | Top Pick Hint +1 |
| Dirt Sprinter | Win both JBC Sprints | 2 Random Stats +10 |
| Kicking Up Dust | Win the Unicorn Stakes, Leopard Stakes, and Japan Dirt Derby | 2 Random Stats +5 |
DANGER
Due to the Race Routes and distribution of Graded Races, Umas used in Trackblazer must have at least a C, ideally B Mile and Medium Aptitude to not miss out on a large amount of Stats.
As demonstrated below, most Graded Races are Miles and Mediums. Being unable to run either of these Distances is highly detrimental in Trackblazer.
Graded Race Distribution
| Unique G1 | |||
|---|---|---|---|
| Distance | Total | Turf | Dirt |
| Sprint | 3 | 2 | 1 |
| Mile | 10 | 7 | 3 |
| Medium | 14 | 10 | 4 |
| Long | 3 | 3 | 0 |
| Unique G2 | |||
|---|---|---|---|
| Distance | Total | Turf | Dirt |
| Sprint | 6 | 6 | 0 |
| Mile | 12 | 11 | 1 |
| Medium | 13 | 13 | 0 |
| Long | 5 | 5 | 0 |
| Unique G3 | |||
|---|---|---|---|
| Distance | Total | Turf | Dirt |
| Sprint | 18 | 15 | 3 |
| Mile | 33 | 26 | 7 |
| Medium | 17 | 15 | 2 |
| Long | 1 | 1 | 0 |
Secondary Routes
These Routes are not as important, and are either ignored or naturally acquired as a consequence of the Races done.
| Epithet | Requirement | Reward |
|---|---|---|
| Pro Racer | Win 10 OP or Above Races | 2 Random Stats +5 |
| Standard Distance Leader | Win 10 Standard Distance Races | 2 Random Stats +10 |
| Non-Standard Distance Leader | Win 10 Non-Standard Distance Races | 2 Random Stats +10 |
| Kanto Conqueror | Win 3 Races in the Kanto Region (Tokyo, Nakayama, Ooi) | 2 Random Stats +5 |
| West Japan Whiz | Win 3 Races in the Kansai Region (Chukyo, Hanshin, Kyoto) | 2 Random Stats +5 |
| Hokkaido Hotshot | Win 3 Races in the Hokkaido Region (Sapporo, Hakodate) | 2 Random Stats +5 |
| Tohoku Top Dog | Win 3 Races in the Tohoku Region (Fukushima, Niigata) | 2 Random Stats +5 |
| Kokura Constable | Win 2 or more Races in Kokura | 2 Random Stats +5 |
| Junior Jewel | Win 3 or more Races with “Junior Stakes” in the name | 2 Random Stats +5 |
| Umatastic | Win 3 or more Races with “Umamusume Stakes” in the name | 2 Random Stats +5 |
| Globe-Trotter | Win 3 or more Races that have a country in the name | 2 Random Stats +5 |
| Turf Tussler | Win a Sprint, Mile, Medium, and Long Turf Race | 2 Random Stats +5 |
Example Schedule
DANGER
These schedules are only meant to provide a basic framework for Trackblazer Careers.
You do NOT have to do every single race suggested in them, especially if a Training turn is exceptionally good.
A critical factor to learning the Scenario is to be able to flexibly deviate from the schedule.
Example Schedules have been moved to the Agenda Planner's presets!
Rival Races

The Race button when there is a Rival Race
On random turns after Early August Junior Year, there will be a Rival Race, noted by the red and blue VS icon on the Races button.
Participating in Rival Races has a chance to add new Items to the Shop. Winning the Rival Race increases these odds, and additionally gives a Skill Hint or +5 to 2 random Stats. Similarly to Team Trials and Unity Cup, the only way to win is to place first; if neither party places first, then it is displayed as a Draw.
INFO
The Skills gained through Rival Races are based on the Distance of the Track and the Running Style used to win the Race.
This is different compared to Spirit Bursts in Unity Cup, which gave Skills based on Aptitude.
Coin Shop and Items

Coin Shop
The usage of the Coin Shop and Items are often what differentiates good and bad Trackblazer Careers.
The Shop is unlocked after the Debut Race, and refreshes every 6 Turns. Races can add additional items to the shop, which last 3 Turns. After a Shop refresh, the new Items have a chance to be discounted.
Stat Items
| Item | Effect | Cost | Worth |
|---|---|---|---|
 | +15 Specific Stat | 30 Coins | Must Buy |
 | +7 Specific Stat | 15 Coins | Must Buy |
 | +3 Specific Stat | 10 Coins | Can be considered with leftover Coins, but is generally low priority. |
Mood Items
| Item | Effect | Cost | Worth |
|---|---|---|---|
 | +2 Mood | 55 Coins | Must Buy, but lower priority than the Small Cupcakes |
 | +1 Mood | 30 Coins | Must Buy |
Energy Items
| Item | Effect | Cost | Worth |
|---|---|---|---|
 | +65 Energy | 75 Coins | Must Buy |
 | +40 Energy | 55 Coins | Must Buy |
 | +20 Energy | 35 Coins | Must Buy |
 | +100 Energy -1 Mood | 70 Coins | Must Buy, can be combined with the Small Cupcake to mitigate the downside |
| Item | Effect | Cost | Worth |
|---|---|---|---|
 | +8 Max Energy | 55 Coins | Skip |
 | +5 Energy +4 Max Energy | 30 Coins | Can be situationally used for the +5 Energy to avoid the 0 Energy Penalty from Races |
Bond Items
| Item | Effect | Cost | Worth |
|---|---|---|---|
 | +5 Bond for All Cards | 40 Coins | Must Buy if important Bonds are missing |
 | +5 Director Akikawa Bond | 10 Coins | Skip |
Race Items
| Item | Effect | Cost | Worth |
|---|---|---|---|
 | +35% Race Bonus for 1 Turn | 40 Coins | Must Buy |
 | +20% Race Bonus for 1 Turn | 25 Coins | Must Buy |
 | +50% Fan Bonus for 1 Turn | 15 Coins | Can be considered when running Narita Top Road with a surplus of Coins while under 200k Fans to activate her Unique Effect faster. |
Training Bonus Items
| Item | Effect | Cost | Worth |
|---|---|---|---|
 | +60% Training Bonus for 2 Turns | 70 Coins | Must Buy |
 | +40% Training Bonus for 3 Turns | 55 Coins | Can be considered when lacking 60% Megaphones |
 | +20% Training Bonus for 4 Turns | 40 Coins | Skip |
| Item | Effect | Cost | Worth |
|---|---|---|---|
 | Shuffles Support Cards | 20 Coins | Must Buy |
 | +50% Specific Training Bonus +20% Energy Consumption For 1 Turn | 50 Coins | Must Buy for the specific Training desired. Does not exist for Wit. |
 | Cannot fail Trainings for 1 Turn | 40 Coins | Must Buy |
Other items
Most items not listed above can be skipped, outside of certain situations:
| Item | Effect | Cost | Worth |
|---|---|---|---|
 | Heals all negative Status Conditions | 40 | Optional. Holding onto at least one can be beneficial. |
 | Heals “Skin Outbreak” | 15 | As Skin Outbreak is common in Trackblazer, holding on to at least one is recommended. |
| All other Status Condition Heals | Heals one specific Condition | 15 | Should only be bought if immediately necessary. |
 | Gives “Fast Learner” | 280 | Can be bought by immediately racing multiple times, especially if discounted and later in a Career. Makes your immediate life difficult and may ruin your run, but Umamusume is a highroll game. However, having enough Credits to immediately buy the Scholar Hat is generally not a good sign. Spending the same number of Coins on Hammers across the entire Career will generally yield more effective SP than a one-off buy for Fast Learner. |
 | Gives “Charming” | 150 | Should only be bought if it appears in the first Shop. |
| Training Facility Items | Raises the level of the Facility by 1 | 150 | Should only be considered with a surplus of Coins. Wit can be considered slightly more due to the lack of a Wit Anklet. |
Gameplay
The most important decision to make in Trackblazer is whether to train or to race. Training remains the best method for acquiring Stats. Outside of G1 Turns, Races can often be skipped in favor of a strong Training. If it doesn’t interfere with any Epithets, G1s can also be skipped for exceptional Training.
Another factor to consider is the Race Fatigue Event from running consecutive Races. As we run many more Races in Trackblazer, knowing the odds of specific downsides in the Race Fatigue Event is conducive to deciding whether to race.
Consecutive Races | |||||
1 Race | 2 Races | 3 Races | 4+ Races | ||
Mood Down | 1+ Energy | 0% | 0% | 60% | 100% |
0 Energy | 15% | 33% | 90+% | 100% | |
Skin Outbreak | 1+ Energy | 0% | 0% | 15% | 33% |
0 Energy | 4% | 8% | 25% | 33% | |
3 Random Stat -10 | 1+ Energy | 0% | 0% | 0% | 40% |
0 Energy | 0% | 0% | 0% | 40% | |
It’s equally important to consider, however, that Race Fatigue Events can and will happen, and can be mitigated through the usage of Items. If holding the right Items, don’t be afraid to Race.
TIP
Mood only affects Stats by 2% per level, and many Races have a chance to raise Mood through the Reporter Events. Because of this, it is recommended to not use Cupcakes until right before Training.
In addition, there are guaranteed Energy and Mood Up Events that can also be used to mitigate the Race Fatigue Event.
| Classic Early Feb | Classic Early Mar | Classic Late Sep |
|---|---|---|
| +1 Mood | +20 Energy | +1 Mood |
| Senior Late Jun | Senior Late Oct | Senior Late Dec |
|---|---|---|
| +20 Energy | +1 Mood | +30 Energy |
Finally, the Race Fatigue Event cannot occur after Late December.
On the other hand, there may be situations where Races are of higher value. For example, if there is a large number of good Items in the current Shop rotation, Races may be prioritized for increasing Coin income.
Junior Year
Pre-Debut
Similar to previous Scenarios, Pre-Debut Turns are spent raising Support Card Friendship (Bond) and Facility levels. As Wit is the most difficult Stat to raise in Trackblazer, it’s recommended to focus on this Facility.
TIP
Because the BBQ Item increases bond evenly across all Cards, its value goes down with each nonessential Card that is under 80 Bond. It is advised to evenly raise Bonds to get maximum value from each BBQ purchased.
WARNING
In Trackblazer, the Debut Race costs Energy!
Post-Debut
After the Debut Race, we unlock other Races. From here on, remember to check Training and Races every Turn, and keep the current Shop rotation in mind. Continue raising the Bond of Support Cards when not Racing.
Here is an example of how the remainder of Junior Year may look:
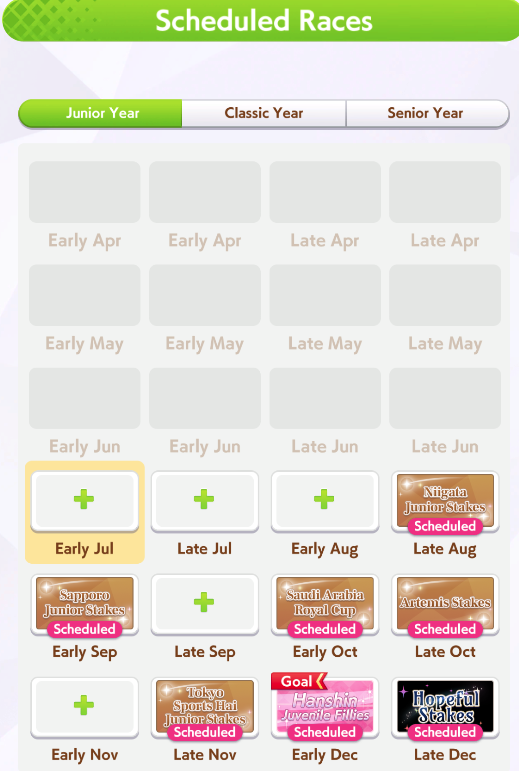
Example Junior Year Schedule (image created prior to Trackblazer)
Classic and Senior Year
Until the Summer of Classic Year, continue focusing on raising the Bonds of all the Support Cards to unlock Friendship Training.
INFO
The base values of the Training Facilities in Trackblazer are the same as Unity Cup, and lower than URA Finale.
Combined with Races having higher value, lone Friendship Trainings are often not worth skipping a Graded Race for.
| Level 1 | Level 2 | Level 3 | Level 4 | Level 5 | |
|---|---|---|---|---|---|
| Speed | 8 / 4 / 2 / -19 | 9 / 4 / 2 / -20 | 10 / 4 / 2 / -21 | 11 / 5 / 2 / -23 | 12 / 6 / 2 / -25 |
| Stamina | 7 / 3 / 2 / -17 | 8 / 3 / 2 / -18 | 9 / 3 / 2 / -19 | 10 / 4 / 2 / -21 | 11 / 5 / 2 / -23 |
| Power | 4 / 6 / 2 / -18 | 4 / 7 / 2 / -19 | 4 / 8 / 2 / -20 | 5 / 9 / 2 / -22 | 6 / 10 / 2 / -24 |
| Guts | 3 / 3 / 6 / 2 / -20 | 3 / 3 / 7 / 2 / -21 | 3 / 3 / 8 / 2 / -22 | 4 / 3 / 9 / 2 / -24 | 4 / 4 / 10 / 2 / -26 |
| Wit | 2 / 6 / 3 / +5 | 2 / 7 / 3 / +5 | 2 / 8 / 3 / +5 | 3 / 9 / 3 / +5 | 4 / 10 / 3 / +5 |
Fewer Turns are spent on Training in Trackblazer, so Training Facilities level slower on average. Summer Turns are more important since all Training Facilities are at Level 5 during Summer.
TIP
Because the Shop resets on the first Turn of Summer, it is recommended to keep at least 100 Coins unless the previous Shops are exceptional.
Summer
Before entering Classic Year Summer, make sure to have a stockpile of Training Items, Energy Items, and Whistles. Megaphones last two Turns, so at minimum 2 should be saved for the Summer Turns.
If the Training is not sufficient, use Whistles until it is. If the Training is sufficient, use Training Items to further improve the Stat gains.
TIP
If there are no sufficient Trainings and we are out of whistles, we can instead Race for a chance of new Items appearing in the Shop for the following Summer Turns.
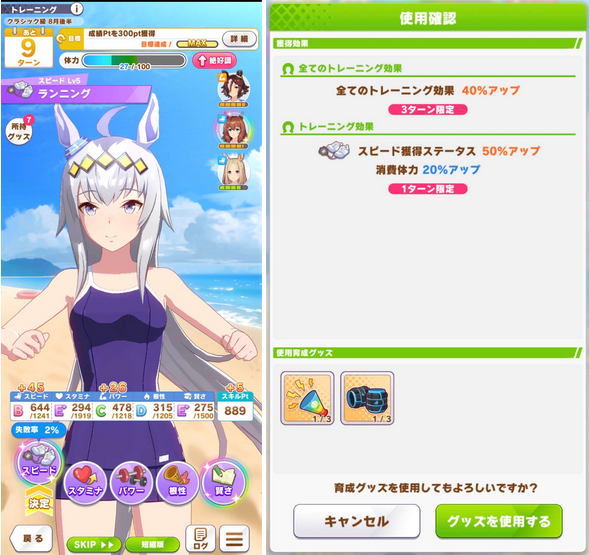
Using Training Items on a strong Summer Training
After Summer
After Classic Year Summer, continue playing as before. Race unless the Training is sufficient or if we are low on Coins and/or Items.
Twinkle Star Climax
The Twinkle Star Climax is the final 3 Races of Trackblazer, which replaces the URA Finale. The Trainee is assigned points based on placement instead of needing to win all 3 Races.
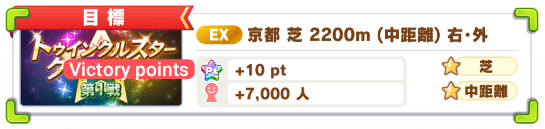
The Twinkle Star Climax
| Placement | Victory Points |
|---|---|
| 1st | 10 |
| 2nd | 8 |
| 3rd | 6 |
| 4th | 4 |
| 5-6th | 3 |
| 7-9th | 2 |
| 10-13th | 1 |
| 14th and lower | 0 |
As long as the Trainee has more combined points than the other Umas, she wins the Twinkle Star Climax. Winning the Twinkle Star Climax awards the player with hints for Radiant Star.
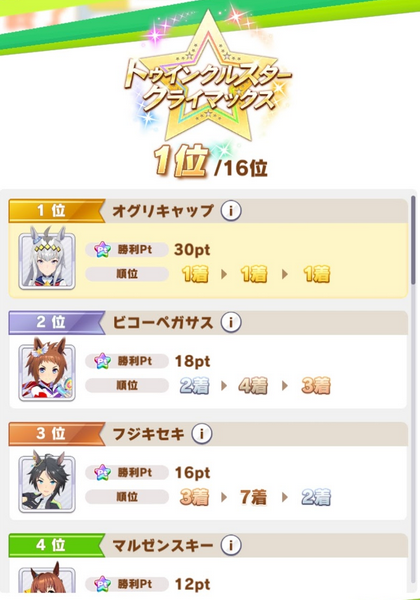
The final result
Similar to the URA Finale, the Twinkle Star Climax consists of 3 Training Turns and 3 Race Turns. Because there are three Training Turns, remember to have a small number of Training Items to push Stats one last time.
In addition, three Golden Hammers should be saved for the Twinkle Star Climax Races. While these Races give less SP than G1s, they give +10 to all Stats at Base, making it very important to have Hammers for these Races. Alternatively, two Hammers can be saved as there is a high chance the final Shop will have a Hammer to purchase. However, this can be a risky decision. Saving Gold Hammers around Senior Summer onwards is recommended.
Finally, around 150 Coins should be saved for the final Shop as the Twinkle Star Climax Races do not reward Coins.
Unique Levels
Compared to the previous Scenarios, Trackblazer has different requirements for leveling Uniques. It is as follows:
| Date | After Late Dec, Junior Year | After Late Dec, Classic Year | After Late Dec, Senior Year |
|---|---|---|---|
| Requirements | 5,000 Fans 19 Yayoi Akikawa Bond (Very slightly below one full bar) | 60,000 Fans 31 Yayoi Akikawa Bond (Slightly above a bar and a half) | 120,000 Fans 51 Yayoi Akikawa Bond (Slightly above two bars and a half) |