Career Mechanics
Also see Unity Cup Career Guide.
Career Trainings
The primary focus during a Career is to manage Energy and Race Schedule.
Stat growth is dependent on several factors, such as Friendship Training, Mood, Facility Level, and so on. The full formula is given below:
Formula for Calculating Training Gain
TIP
Roses are red,Violets are blue;This formula is complicated,so we did it for you.
In essence, the goal is to have multiple cards of the same type in order to hit large stat gains through stacked Friendship Trainings. In addition, we can supplement our deck with “roaming” cards, i.e. cards with high Training Effectiveness / Mood Effect and low Specialty Priority, such as SSR Fine Motion ![]() . Roaming cards often appear in other stats and provide boosts to stat gains through their Training Effectiveness.
. Roaming cards often appear in other stats and provide boosts to stat gains through their Training Effectiveness.
Refer to the Support Cards section for more details on how Card Stats affect Training.
Base Training Values
Below are the Base Training values for clicking a training during a Career Run.
The higher the facility level is, the more base stats the training provides.
(Ex. Level 1 speed in URA gives 10 speed, 5 power, and 2 Skill Points before any modifiers from support cards, growth rates, or mood.)
- Speed training: Speed / Power / SP / Energy
- Stamina training: Stamina / Guts / SP / Energy
- Power training: Stamina / Power / SP / Energy
- Guts training: Speed / Power / Guts / SP / Energy
- Wit training: Speed / Wit / SP / Energy
URA Base Trainings
| Level 1 | Level 2 | Level 3 | Level 4 | Level 5 | |
|---|---|---|---|---|---|
| Speed | 10 / 5 / 2 / -21 | 11 / 5 / 2 / -22 | 12 / 5 / 2 / -23 | 13 / 6 / 2 / -25 | 14 / 7 / 2 / -27 |
| Stamina | 9 / 4 / 2 / -19 | 10 / 4 / 2 / - 20 | 11 / 4 / 2 / -21 | 12 / 5 / 2 / -23 | 13 / 6 / 2 / -25 |
| Power | 5 / 8 / 2 / -20 | 5 / 9 / 2 / -21 | 5 / 10 / 2 / -22 | 6 / 11 / 2 / -24 | 7 / 12 / 2 / -26 |
| Guts | 4 / 4 / 8 / 2 / -22 | 4 / 4 / 9 / 2 / -23 | 4 / 4 / 10 / 2 / -24 | 5 / 4 / 11 / 2 / -26 | 5 / 5 / 12 / 2 / -28 |
| Wit | 2 / 9 / 4 / +5 | 2 / 10 / 4 / +5 | 2 / 11 / 4 / +5 | 3 / 12 / 4 / +5 | 4 / 13 / 4 / +5 |
Unity Cup Base Trainings
| Level 1 | Level 2 | Level 3 | Level 4 | Level 5 | |
|---|---|---|---|---|---|
| Speed | 8 / 4 / 2 / -19 | 9 / 4 / 2 / -20 | 10 / 4 / 2 / -21 | 11 / 5 / 2 / -23 | 12 / 6 / 2 / -25 |
| Stamina | 7 / 3 / 2 / -17 | 8 / 3 / 2 / -18 | 9 / 3 / 2 / -19 | 10 / 4 / 2 / -21 | 11 / 5 / 2 / -23 |
| Power | 4 / 6 / 2 / -18 | 4 / 7 / 2 / -19 | 4 / 8 / 2 / -20 | 5 / 9 / 2 / -22 | 6 / 10 / 2 / -24 |
| Guts | 3 / 3 / 6 / 2 / -20 | 3 / 3 / 7 / 2 / -21 | 3 / 3 / 8 / 2 / -22 | 4 / 3 / 9 / 2 / -24 | 4 / 4 / 10 / 2 / -26 |
| Wit | 2 / 6 / 3 / +5 | 2 / 7 / 3 / +5 | 2 / 8 / 3 / +5 | 3 / 9 / 3 / +5 | 4 / 10 / 3 / +5 |
Unity Training Bonus (Arrows) - Flat Increase
| 1 arrow | 2 arrows | 3 arrows | 4 arrows | 5 arrows | |
|---|---|---|---|---|---|
| Speed | No bonus. | +2 Speed | 3 / 1 / 1 | 5 / 2 / 2 | 7 / 3 / 3 |
| Stamina | No bonus. | +2 Stamina | 3 / 1 / 1 | 5 / 2 / 2 | 7 / 3 / 3 |
| Power | No bonus. | +2 Power | 1 / 3 / 1 | 2 / 5 / 2 | 3 / 7 / 3 |
| Guts | No bonus. | +2 Guts | 1 / 1 / 2 / 1 | 2 / 1 / 4 / 2 | 2 / 2 / 6 / 3 |
| Wit | No bonus. | +1 Wit | 0 / 2 / 1 | 1 / 3 / 2 | 2 / 4 / 3 |
Blue bursts also count as arrows.
INFO
Scenario Link Support Cards provide additional Unity Training stats.
Scenario Link Bonus to Unity Trainings - Flat Increase
| 1 arrow | 2 arrows | 3 arrows | 4 arrows | |
|---|---|---|---|---|
| 1 scenario link | No bonus. | +1 to all non-zero stats. | +1 to all non-zero stats. | +1 to all non-zero stats. |
| 2 scenario links | No bonus. | ??? | ??? | ??? |
Spirit Bursts
| 1 Burst [-5 Energy, +5 if Wit] | 1 Burst w/Scenario Link [-5 Energy, +5 if Wit] | 2 Bursts [-11 Energy, +5 if Wit] | 3 Bursts [-15 Energy, +5 if Wit] | |
|---|---|---|---|---|
| Speed | +15 Speed / +7 Power | +20 Speed / +10 Power | +30 Speed / +14 Power | +45 Speed / +21 Power |
| Stamina | +15 Stamina / +7 Guts | +20 Stamina / +10 Guts | +30 Stamina / +14 Guts | +45 Stamina / +21 Guts |
| Power | +15 Power / +7 Stamina | +20 Power / +10 Stamina | +30 Power / +14 Stamina | +45 Power / +21 Stamina |
| Guts | +15 Guts / +3 Speed / +3 Power | +20 Guts / +5 Speed / +5 Power | +30 Guts / +6 Speed / +6 Power | +50 Guts / +11 Speed / +11 Power |
| Wit | +10 Wit / +2 Speed / +5 SP | +15 Wit / +5 Speed / +5 SP | +20 Wit / +4 Speed / +10 SP | +30 Wit / +6 Speed / +15 SP |
Leveling up Training Facilities
URA Scenario
Training Facilities level up after 4 turns of training. There is no other way to increase Training Facility level, so ensure the deck is set up in a way that maximises the amount of turns spent focusing on the desired stats. For example, stacking Speed cards will effectively accelerate Speed Facility levels.
Unity Cup Scenario
In Unity Cup, Training Facility levels are tied to Unity Team Stat Ratings.
The Training Facility level to Team Stat is as below:
| Training Facility Level | Required Team Stat Rating |
|---|---|
| Level 1 | G |
| Level 2 | E |
| Level 3 | C |
| Level 4 | A |
| Level 5 | S |
For example, if we had a Team Speed Stat of C, our Speed Facility would be Level 3.
Summer Camp
Summer Camp occurs between Early July and Late August in the Classic and Senior years.
During Summer Camp, all of our Training Facilities are upgraded to level 5, making this a great opportunity to increase any stats for which our deck has no cards. For example, we can increase Stamina while running a Speed/Wit deck.
Regardless of your current Facility Levels, all training facilities become Level 5 during Summer Camp.
Additionally, Summer Camp has a different type of Rest called Rest & Recreation. Unlike a normal Rest, Rest & Recreation gives 40 Energy and +1 Mood, as well as healing all negative conditions. This however does not heal Career-specific negative Conditions such as Super Creek's Under the Weather Condition.
To make the most of Summer Camp, we will want to ensure we have high Energy before Early July. However, in cases where our mood is less than Great, or when we have negative conditions, it can be worthwhile to enter Summer Camp with less energy and spend Early July choosing Rest & Recreation.
Before Late Aug in Classic Year, there is also an event which can grant either +10 Power or +10 Guts depending on our choice. Power is always the top choice; Guts is always the bottom choice.
Leveling up your Uma's Unique Skill
In Senior Year, there are 3 events which will level up our Uma’s Unique Skill if we meet certain requirements. The fan count requirements for Turf and Dirt Umas are different: Dirt races typically have lower fan counts, as well as there being fewer graded dirt races. Hybrid Umas such as Oguri Cap have Turf Uma fan requirements.
| Timing | Requirements | Requirements Met | Requirements Not Met |
|---|---|---|---|
| After Late January (Valentine’s Day) | Turf Uma: Have 60,000 fans Dirt Uma: Have 40,000 fans | +1 Unique Skill Level | +20 Skill Points |
| After Late March (Fan Fest) | Turf Uma: Have 70,000 fans and Director bond above 60* (URA only) Dirt Uma: Have 60,000 fans and Director bond above 60* (URA only) | +1 Unique Skill Level +1 Mood | +25 Skill Points -5 Energy |
| After Early December (Holiday Season) | Turf Uma: Have 120,000 fans Dirt Uma: Have 80,000 fans | +1 Unique Skill Level | +20 Skill Points |
Other Career Events
New Years Event
Yearly event that can recover Energy, add Skill Points, or gain some stats. Takes place before Early Jan in Classic and Senior Years.
TIP
Classic Year: It is generally recommended to prioritize Energy unless it will overflow, in which case Skill Points are chosen.
Senior Year: Due to the Raffle event restoring Energy, Skill Points are usually recommended as long as Energy is sufficiently high for Training on the next turn.
| Option | Classic Year | Senior Year |
|---|---|---|
| Top | +10 to one Stat | +30 Energy |
| Middle | +20 Energy | +5 to all Stats |
| Bottom | +20 Skill Points | +35 Skill Points |
Raffle Time!
Once per run event that potentially increases Energy, stats, and Mood. Takes place before Late Jan in Senior Year, the turn after the Senior Year New Years Event.
| Raffle Prize | Effect | Frequency |
|---|---|---|
| Tissue | Mood down | 10% |
| 1 Carrot | 20 Energy | 45% |
| Bushel of Carrots | 20 Energy, +5 to all Stats, Mood up | 30% |
| Hamburg Steak | 30 Energy, +10 to all Stats, Mood up | 10% |
| Hot Spring Ticket | 30 Energy, +10 to all Stats, Mood up | 5% |
Positive Conditions
| Positive Condition | How to get it | What does it do |
|---|---|---|
| Practice Perfect | Various Uma & Support Card events (ex. SSR Kitasan Black’s random event), Picking bottom option after failed training | Reduces failure chance during trainings by 2%. |
| Fast Learner | Various Uma & Support Card events | Reduces the cost of all purchasable skills by 10%. |
| Charming | Various Uma & Support Card events (ex. SR Sweep Tosho’s random event) | Increases Bond gain when training with a given support card by +2. |
| Hot Topic | Various Uma & Support Card events (ex. SR Daitaku Helios’ random event) | Increases Bond gain when training with NPCs (Director Akikawa and Journalist Etsuko) by 40%. |
Infirmary & Negative Conditions
There are currently 6 general Negative Conditions in the game. These can be cured in one of five ways.
- Spending a turn in the Infirmary
- Choosing the top option during the random Extra Training event
- Rest & Recreation during Summer Camp
- Shrine date event during Recreation
- Specific cure methods for each Negative Condition
All cure methods outside of Summer Camp and some specific cure methods have a chance of failure.
The table below contains more details about each negative condition, as well as the additional cure method specific to the condition type.
| Negative Condition | How to get it | What it does | Specific cure methods |
|---|---|---|---|
| Practice Poor | Random chance from Failed Training (other than Wit Training) | Adds a 2% failure chance to all trainings. | Obtain a Practice Perfect condition |
| Night Owl | Random chance from Resting | Has a chance to -10 energy, and/or -1 mood | Get the “Well Rested!” event when Resting |
| Skin Outbreak | Random chance from consecutive races (3 or more) | Has a chance to -1 mood | Get the “Well Rested!” event when Resting |
| Slow Metabolism | Random chance from food-related Uma events | Prevent the increase of speed during training | Chance of cure when doing stat training |
| Migraine | Random event | Prevents mood from increasing | No confirmed additional methods of cure |
| Slacker | Random event | Chance of the Uma not showing up to training | Chance of cure when successfully training with Etsuko (Reporter) |
In addition, there are also Uma-specific events that can cause Negative Conditions, some of which are unique to the Uma.
Inspiration Events
Inspiration Events grant additional stats & potential Skill Hints / Aptitudes to your trainee.
They occur after the Late March turn during Classic and Senior Year.
See the Sparks page for more information on Inspiration mechanics.
Acupuncturist
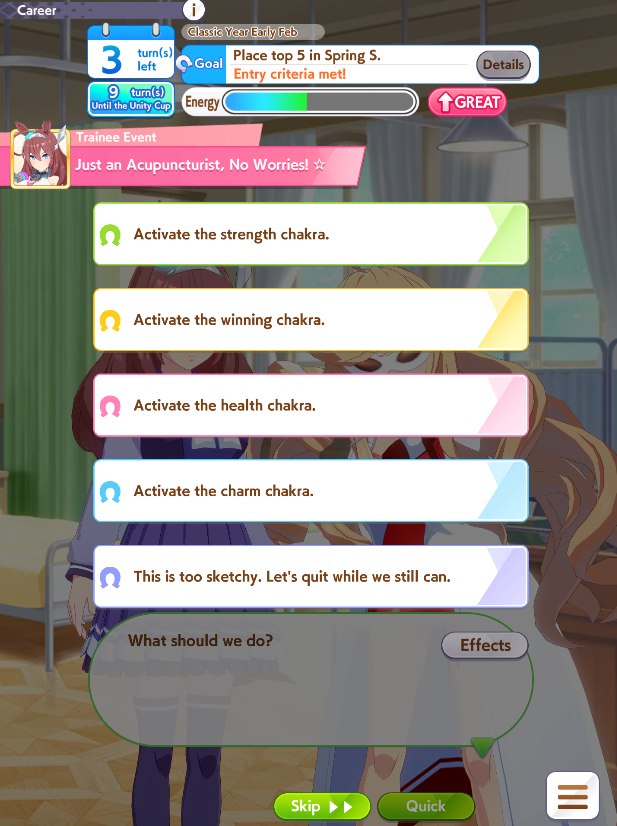
Acupuncturist Sasami Anshinzawa Event Options
As a rare chance during any Career, Acupuncturist Sasami Anshinzawa may appear and offer her services. Below is the table of possible outcomes.
| Option | Success Chance | Success Reward | Failure |
|---|---|---|---|
| Strength Chakra | ~30% | +20 to All Stats | -2 Mood, -15 All Stat, Receive Night Owl |
| Winning Chakra | ~50% | Obtain | -20 Energy, -2 Mood |
| Health Chakra | ~70% | +12 Maximum Energy, +40 Energy, and Heal any Negative Status Effect | -20 Energy, -2 Mood, Receive Practice Poor |
| Charm Chakra | ~90% | +20 Energy, +1 Mood up, and Gain Charming | -10 or -20 Energy, -1 Mood, Chance to Receive Practice Poor |
| Quit | 100% | +10 Energy | N/A |
The Strength Chakra is not worth the risk, but the other three options are quite good.
- The Charm Chakra is only considered if extremely early into the Career (Early Junior Year) for the Charming Condition.
- The Winning Chakra is great for longer distances or if aiming to raise Rating, and is usually considered the best choice.
- The Health Chakra is always somewhat valuable if unsure on what to take.
- If the Career Run is already above average, being disciplined and choosing to quit the event can be considered.
INFO
This event does have a chance to appear in Unity Cup, but it has been observed to be much rarer than in the URA Finale Scenario.
Scenario Link
Umamusume and Support Cards will sometimes have the Scenario Link highlighted in character and support card selection. Using one or more of these scenario links will give bonuses to various stats, skills, training, and events.
For example, in Unity Cup, using a scenario-linked Uma will have her unique event give +10 to a given stat (shown below) and 10 SP. Additionally, hitting S-rank will give an additional +2 hints to ![]() It’s On! and one additional point to all stats.
It’s On! and one additional point to all stats.
| Scenario | Umamusume / Support Card | Bonuses |
|---|---|---|
| URA Finale | Aoi Kiryuin | |
| Unity Cup | Any Scenario Link | +1 to All Stats, |
| Unity Cup | Taiki Shuttle | +10 Speed, +10 SP, |
| Unity Cup | Rice Shower | +10 Stamina, +10 SP, |
| Unity Cup | Haru Urara | +10 Guts, +10 SP, |
| Unity Cup | Matikanefukukitaru | +10 Wit, +10 SP, |
| Unity Cup | Riko Kashimoto | +10 Wit, +10 SP, +5 Energy, +1 Mood |